Automatic Election Result Updates with Pushover

My fire department has a small levy on the ballot today. I wanted to get updated election results on my phone. It turns out doing this with Pushover is really easy. Pushover allows you to push notifications to your phone and other devices.

Setting Up Pushover

If you don't already have one, create a Pushover account, install the app, and buy a license for at least one device. Then, login and click the 'Create New Application/API Token' link. Fill in the basic info and click <Create Application>. Each app has a free 7500 message a month. More than enough for me.

/images/pushover_create_app.thumbnail.png

Once your app is created you'll get an API Token/Key. You'll need this and your user key (which can be found in the top-right corner of your main account page) to push to your devices.

Getting The Election Results

The results are posted on my State's election website. Because I'd never used it before I decided to scrape the data with BeautifulSoup. The data is machine generated as a bunch of tables without useful IDs. I'm sure you could do it more gracefully than I did, but this worked and gave me some insight into the available tools in BeautifulSoup.

The data is also available for download via CSV or XML. Either of which would have been easier and more reliable. But again, I wanted an excuse to play with BS4.

Sending The Results

Sending the results is really easy. Pushover just needs a POST to its URL with the token, user, and message. Something like this:

data = {
    "token": PUSHOVER_APP_ID,
    "user": PUSHOVER_USER_KEY,
    "title": "Levy Results",
    "message": results
}
requests.post(PUSHOVER_URL, data=data)

There is more you can do with Pushover including HTML styling, sending links, and sending attachments including pictures which will be displayed in the notification. You can also set the priority and notification sound. Check out the API docs for details.
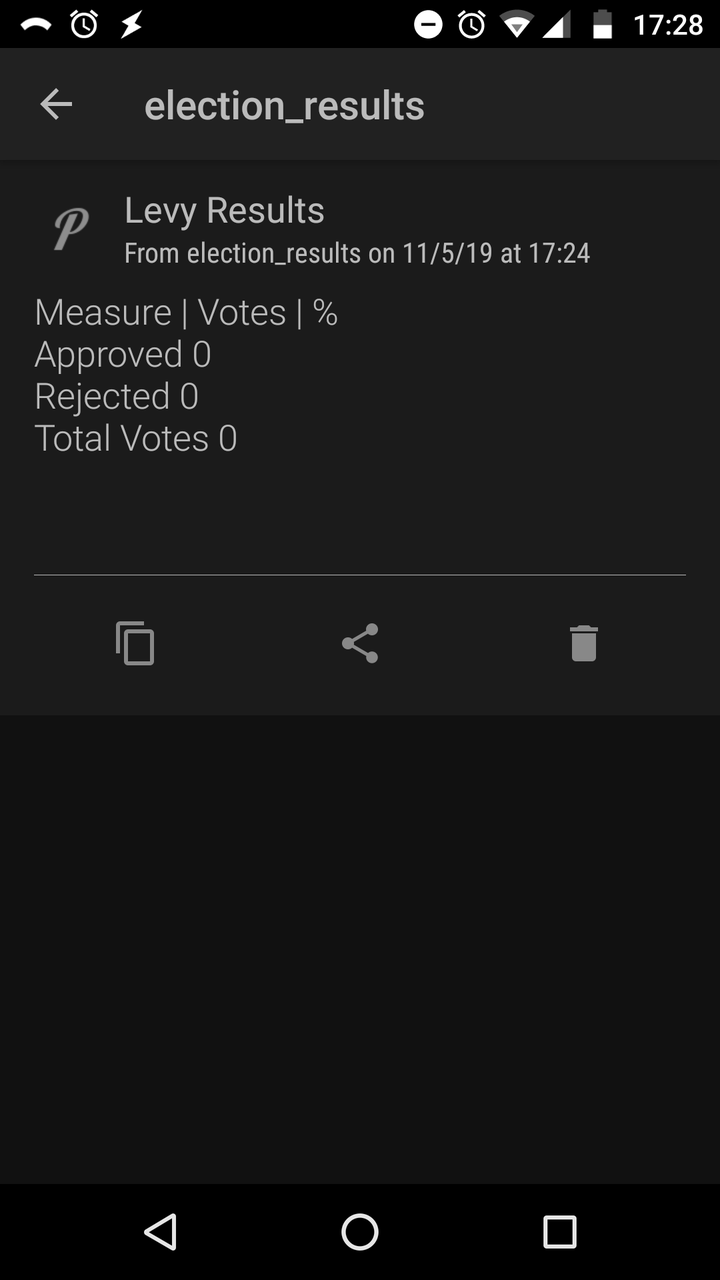
The Final Result

On my phone I get pushover notifications like this. There are still no results posted, once there are it will send both counts and percentages.

/images/pushover_election_results.thumbnail.png

Because this is a throwaway script I'm just using a while loop and having it sleep every 5 minutes between checks.

import datetime
import time

import requests
from bs4 import BeautifulSoup


PUSHOVER_APP_ID = "your_app_key"
PUSHOVER_USER_KEY = "your_user_key"
PUSHOVER_URL = "https://api.pushover.net/1/messages.json"


def get_current_page():
    return requests.get("https://results.vote.wa.gov/results/current/skagit/")


def get_last_update(html_doc):
    soup = BeautifulSoup(html_doc, 'html.parser')
    lu_label = soup.find(string="Last Tabulated")
    lu_text = lu_label.next_element.string
    try:
        """Format: 11/05/2019 1:18 PM"""
        return datetime.datetime.strptime(lu_text, "%m/%d/%Y %I:%M %p")
    except:
        return None


def get_results(html_doc):
    soup = BeautifulSoup(html_doc, 'html.parser')
    race_title_tr = soup.find(string=" FIRE DISTRICT 11 Local Proposition No. 1 - Property Tax Levy for Fire Protection and Emergency Medical Services").parent.parent.parent
    table_rows = race_title_tr.next_siblings
    results = "Measure | Votes | %"
    for row in table_rows:
        columns = row.findAll('td')
        for column in columns:
            results += column.get_text() + " "
        results += "\n"
    return results


def push_results(results):
    data = {
        "token": PUSHOVER_APP_ID,
        "user": PUSHOVER_USER_KEY,
        "title": "Levy Results",
        "message": results
    }
    requests.post(PUSHOVER_URL, data=data)


if __name__ == "__main__":
    latest_results = datetime.datetime(1, 1, 1)
    last_tabulated = None
    while True:
        html = get_current_page()
        if html.status_code == 200:
            last_tabulated = get_last_update(html.text)
        if last_tabulated is not None and last_tabulated > latest_results:
            latest_results = last_tabulated
            results = get_results(html.text)
            push_results(results)
        print(datetime.datetime.now())
        time.sleep(300)

Using Active911's URL Integration (Webhook)

Due to changes in our County's dispatch system my fire department has begun using Active911 for phone-based dispatch and response. For the most part it has worked pretty well. There are a few issues, but their support has been responsive so I'm hopeful they'll all get sorted out eventually. For my part, I'm most excited that they offer both inbound API and outbound integration options.

At least I was excited about the integration options until I saw the documentation. It doesn't tell you basic things like what HTTP method will be used and what format the data will come in. When I asked Active911's support to answer these questions they told me they couldn't "disclose" the basic required information you'd need to use this feature. So I fired up ngrok and let it run for a while until it captured a few calls worth of data. This post is based on an email I sent to support with attached feature documentation in MediaWiki syntax with the hope that they'll post it on their site.

Once you log in to your Active911 in the Agency tab click 'New Integration'. You can see there are several pre-built integration options. I want the data to come to my app so select 'Other'. Give it a name and provide the URL you want contacted whenever a call comes in.

/images/active911_newintegration.png

With that setup Active911 will make a POST request to your specified URL when a new alert is received.

Important to note is that you cannot trigger this webhook by creating your own alerts through the app or the web admin. It is only triggered via alerts that come from your dispatch system.

The Content-Type header is set to 'application/json' and the data is a valid JSON object that looks something like this:

{
 "agency": {
   "name": "Your agency's name",
   "id": 99999,
   "timezone": "America/Los_Angeles"
 },
 "alert": {
   "id": "999999999",
   "city": "Corvalis",
   "coordinate_source": "google",
   "cross_street": "",
   "description": "",
   "details": "Alert details and notes.",
   "lat": -123.296392,
   "lon": 44.550964,
   "map_address": "4100 SW Research Way",
   "map_code": "",
   "place": "",
   "priority": "",
   "received": "1570054351",
   "source": "",
   "state": "OR",
   "unit": "",
   "units": "11",
   "pagegroups": ["0"],
   "stamp": 1570054351.43062
   }
 }

Keep in mind that I'm inferring based on what I got from the few calls that I collected. I'm not sure what some of the fields mean, what the range of possible options is for some fields, or even if this the superset of all possible fields.

A few things that seem true to me:

  • 'received' and 'stamp' are both Unix Epoch time stamps.

  • 'alert':'id' is the same value that can be found for the alarm in the Active911 admin page under 'Details' as 'Active911 #'.

  • 'pagegroups': The 'everyone' group has a value of "0".

  • 'details' uses 'rn' for new lines.

There are still things I don't know for sure, but I'm sure Active911 knows and could fill in the gaps:

  • Is 'unit' the unit number such as 'Apt B' or 'Unit 401'?

  • What are the possible values for 'coordinate_source'?

  • Is there a known set of values for 'priority' or is that agency/dispatch center specific?

  • Is there a known set of values for 'source'?

  • Is the array of 'pagegroups' always a string of integers represented as strings or will there be strings as well?

  • Are there other fields that might be included based on type of call or dispatch information?

  • Basically every field with an empty value I didn't get data for, so it isn't always clear what the field represents or what data might be included.

I plan to use the webook integration to trigger my app to query their API when we receive calls. The API appears to be much better documented, so I expect that part to go smoothly.

When Active911 updates their docs I'll update this post to link to the official docs. In the meantime hopefully this will be helpful to someone.

Setting Column Width with OpenPyXL

I am using OpenPyXL to generate some Excel downloads from one of my Django apps. In general, I'm pretty happy with how it works. Setting a column width is easy. Figuring out how to do that from the documentation is hard. So here it is, just in case someone else needs to know (or me a week from now when I forget).

Assuming you have OpenPyXL installed, to set the width of Column A to 50:

from openpyxl import Workbook

wb = Workbook()
worksheet = wb.active
worksheet.column_dimensions['A'].width = 50

wb.save(filename="col_width.xlsx")

Using Bootstrap Buttons with Django-Tables2

Lots of my Django projects involve displaying some list of results in a table. Doing that in with a for loop in a template is easy enough, but if a project involves more than one page of results, using django-tables2 can make it even easier. It offers a few advantages over hand-built tables:

  • Clean templates

  • DRY with classes

  • Automatic sorting with clickable headers

  • Automatic pagination

  • Integration with django-filter

When displaying a list of results, I often want to have an open or edit button to let users go to the details form for each item. An example from my training database:

/images/tables_open_button.png

This post won't cover the full use of django-tables2. For that see the docs.

In my settings I've told django-tables2 to use the built-in Bootstrap4 template.

settings.py

DJANGO_TABLES2_TEMPLATE = "django_tables2/bootstrap4.html"

To add the Open button we need to add a column to our table class. In the example below the date, description, tags, and points columns are all part of the model. The edit column is where we add our button.

tables.py

from django_tables2 import tables, TemplateColumn
from my_app.models import Training

class TrainingTable(tables.Table):
    class Meta:
         model = Training
         attrs = {'class': 'table table-sm'}
         fields = ['date', 'description', 'tags', 'points', 'edit']

     edit = TemplateColumn(template_name='pages/tables/training_update_column.html')

The TemplateColumn lets you load arbitrary HTML into a cell. The HTML can be a snippet of a Django template. The column will pass in useful data that you can use in your template. In this case I'm using 'record', but you can also pass in any arbitrary data using the 'extra_context'.

In this case I'm also setting a few Bootstrap classes to style the table the way I like it using attrs in Meta. This is optional.

The template itself is just a single line that defines the button using some Bootstrap classes and builds the link in the normal Django way. 'training_update' is the name of a path in urls.py. The important bit is that record is passed in by the table. It represents the row and because this table is using a model it has access to all the fields in the model; even those not displayed in the table. In this case record.id is the primary key that the path expects.

pages/tables/training_update_column.html

<a class="btn btn-info btn-sm" href="{% url 'training_update' record.id %}">Open</a>

Because the page template is already loading Bootstrap there is no reason to do it here. The templates aren't limited to a single line. You can load as much as you like.

To reuse the template across multiple tables you could easily use the extra_context to pass in the path name for the contents in the table and then access it from the template. In my case, the tables have different styling and since the templates are so small, the duplication in code is minimal and I prefer the simplicity of having a separate template for each table's edit column.

One of the best parts, as mentioned above, is how clean the page's template becomes:

pages/training_list.html

{% extends "base.html" %}
{% load django_tables2 %}

{% block content %}
{% render_table table %}
{% endblock content %}

In this case the template pulls in my base template (where we pull in the Bootstrap stuff), loads the django_tabes2 requirements and then renders the table. The entire table is handled by the {% render_table table %}. All the styling is handled by the classes we added in the TrainingTable class definition.

While this example uses Bootstrap throughout, that isn't at all necessary. You could use another framework or pure, handcrafted, artisanal HTML. Whatever fits your project.